AI Image Generator for Amazon Listing: How I Build a Full Image Set
When I use an AI image generator for Amazon listing work, I start the same way I start a client image set, with the product that will ship, the buyer's doubts, and the marketplace rules the image has to survive. A seller should not need to write a production brief for every image. In LoomaDesign, the seller gives the product facts and selling points. The feature already knows the visual job it is meant to do, so the useful input is simple: material, size, color, included parts, use case, feature claims, and buyer objections.
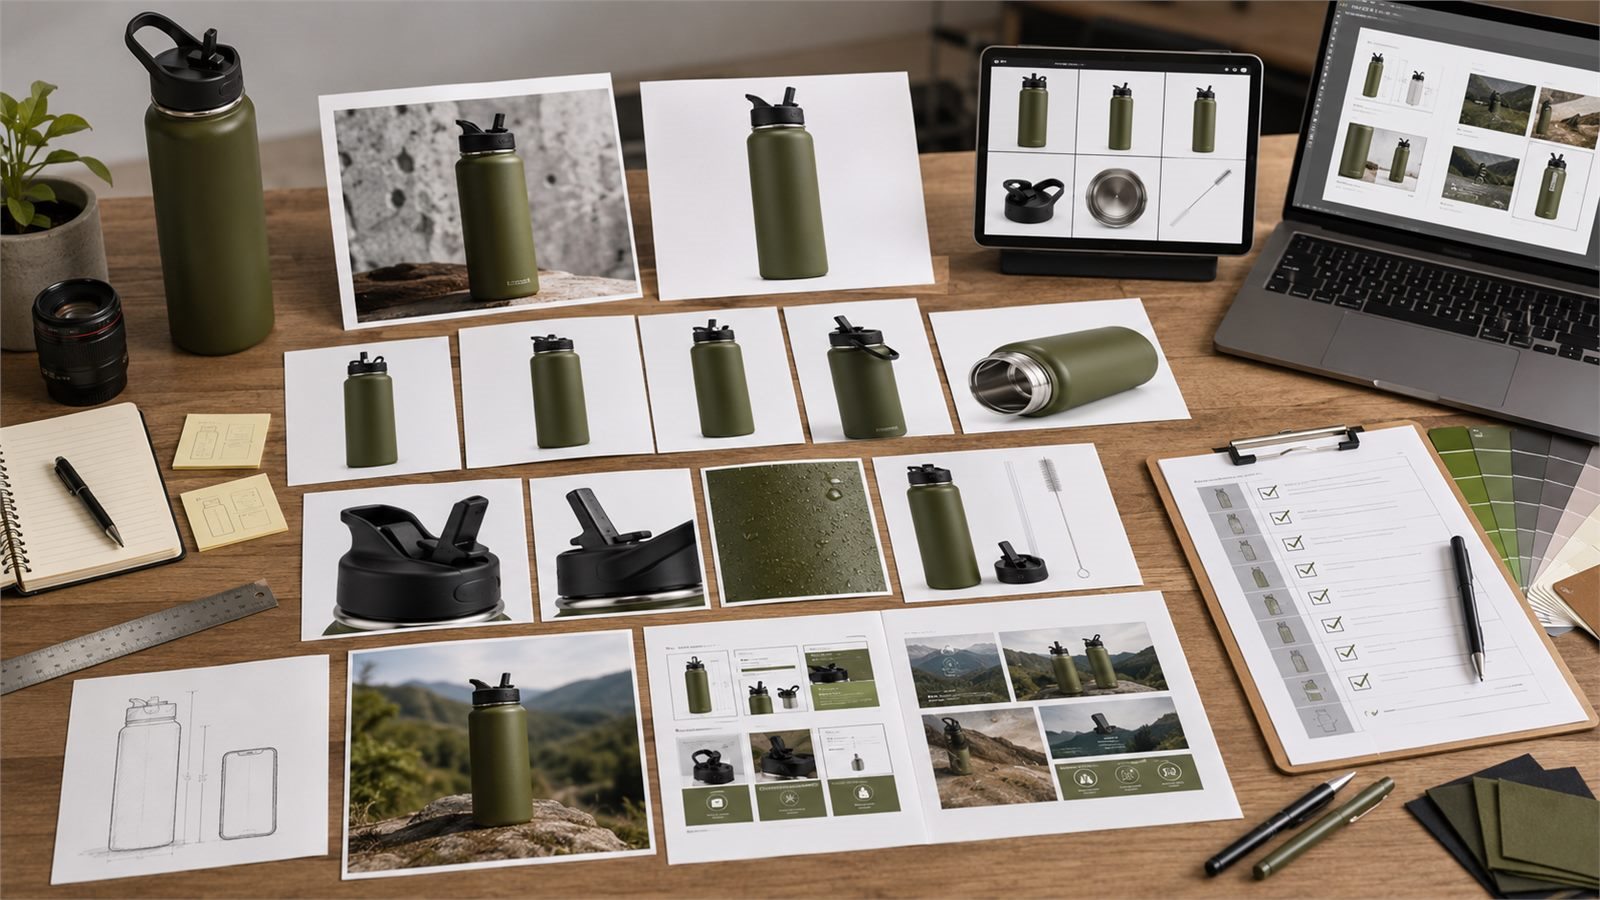
I use the tool like a compact ecommerce design desk. First I clean the source photo. Then I build the main image, additional angles, detail proof, scale reference, lifestyle scene, comparison image, and A+ support visuals from the same product truth. A normal freelance brief for that set can become six or eight separate instructions. In LoomaDesign, I can keep it as one structured pass, then review each output against the same SKU facts. That saves time, and it helps me catch the moment when a generated image starts making the product look better than the real item.
On this page
- Workflow Example: A 32 oz Water Bottle
- The Marketplace Image Rules I Design Around
- AI Image Generator Workflow in LoomaDesign
- Product Shot White Background
- Amazon Listing Image Size and Main Image QA
- Best Practices 2026: Selling Points to Buyer Proof
- Gallery Design: Build the Set in Buyer Order
- Amazon A+ Content Image Workflow
- Common Image Mistakes I Reject Before Upload
- Category Notes
- The Final QA Checklist
- FAQ
Workflow Example: A 32 oz Water Bottle
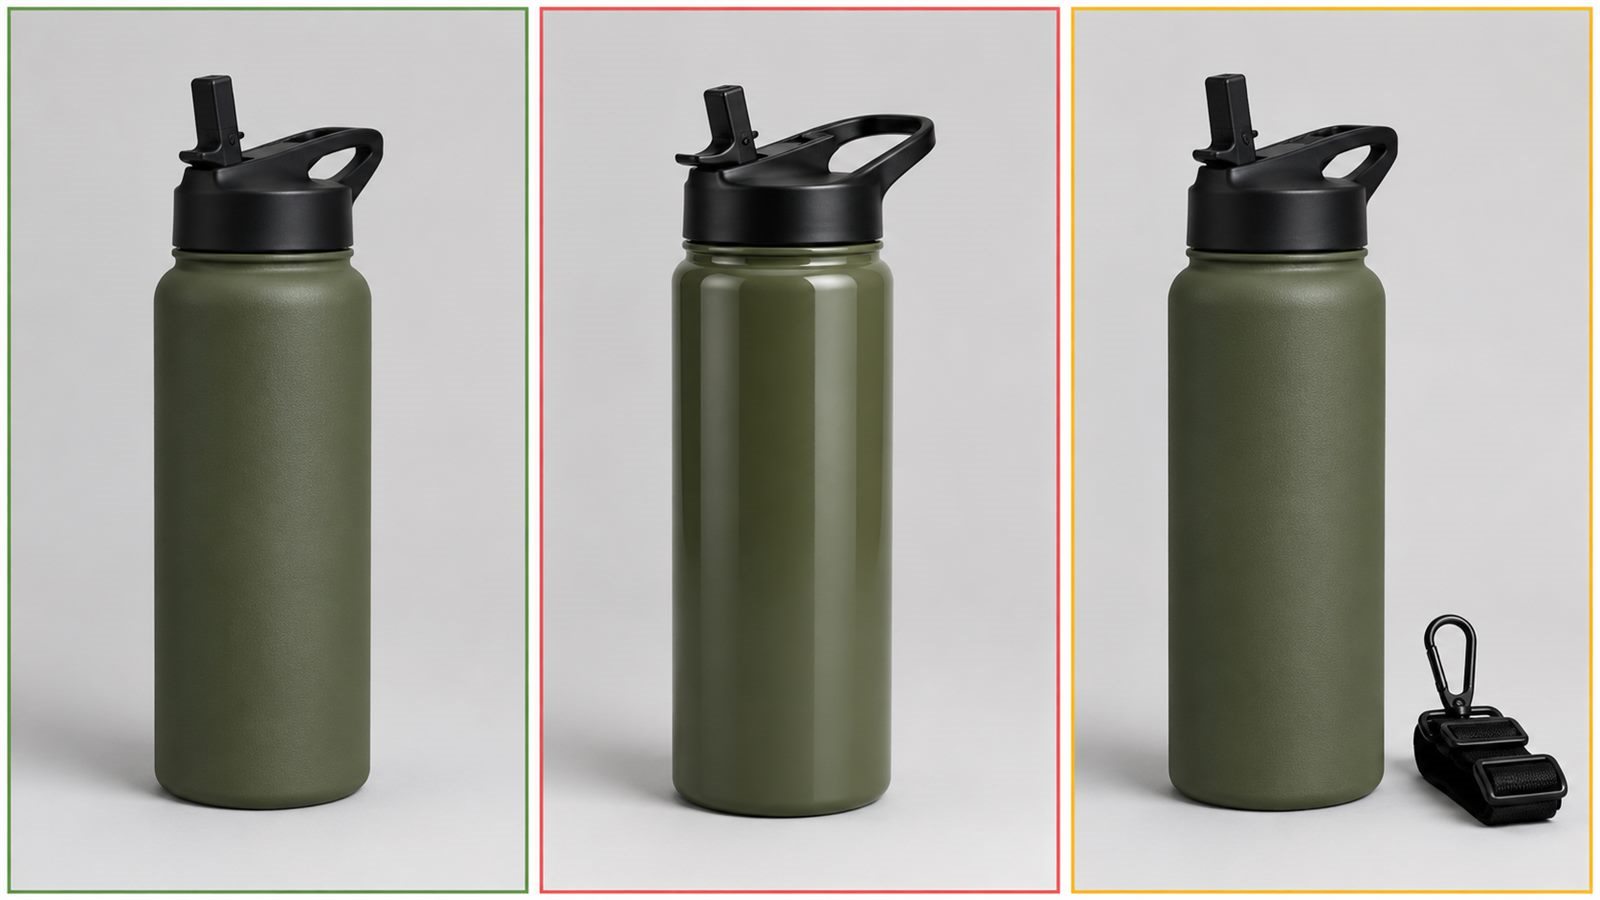
I'll use a product type I see often in ecommerce design work: a 32 oz insulated water bottle with a matte olive body, black flip straw lid, stainless interior, powder-coated finish, and a cleaning brush in the box.
In a real project, this is usually the moment when the seller has scattered material: one supplier photo, a few phone shots, a bullet list from the product page, and maybe a competitor gallery they like. My job is to turn that loose material into a listing image system without making the bottle look like a different SKU.
This product looks simple, but the image set has many places to go wrong. The lid can change shape. The straw can disappear. The matte finish can become glossy. The bottle can look thinner than the real item. A lifestyle scene can show the bottle in a car cup holder even if the real bottle does not fit. A feature callout can claim leakproof performance when the brand only says leak-resistant.
That is why I write the product facts first.
My working note for this bottle includes:
- product name: insulated water bottle
- size: 32 oz
- color: matte olive green
- lid: black flip straw lid with loop handle
- material: stainless steel body, powder-coated finish
- included parts: bottle, lid, straw, cleaning brush
- selling points from the seller: keeps drinks cold, easy to carry, easy to clean, durable outdoor use
- details that cannot change: lid shape, handle position, straw opening, bottle proportion, bottom band, body color
The seller gives this kind of input in plain language. The system should translate those facts into the right visual jobs.
The Marketplace Image Rules I Design Around
Amazon Ads product detail page guidance recommends four or more high-quality images showing different angles, important details, features, use, and variations when the product has them. It also recommends a plain white background, at least 80% product fill, and at least 1000 pixels in height or width so shoppers can use zoom.
Amazon's A+ Content overview expands the same idea into richer modules. A+ content can include enhanced images, customized text placements, comparison charts, videos, hotspots, carousels, and Q&A modules. Amazon's A+ Content design guide recommends clear, well-lit product photos, lifestyle imagery, short copy, technical specifications, comparison charts, and care with text inside images because mobile resizing can make text unreadable.
Those rules change the way I use AI. I avoid asking the tool to invent a premium version of the product. I ask it to produce the image jobs Amazon already wants: clear main image, useful angles, detail proof, usage context, variants, and A+ modules that make the buying decision easier.
AI Image Generator for Amazon Listing Workflow in LoomaDesign
The strongest workflow uses several LoomaDesign features together. One function cleans the input. Another expands the gallery. Another turns the same product truth into A+ modules. The result feels closer to a small ecommerce design team than a single image generator.
| Stage | LoomaDesign feature | What I use it for | What I check |
|---|---|---|---|
| 1 | Product Retouching and White Background Tool | Clean the source product photo and prepare a main-image candidate | white background, product fill, crop, shadow, color |
| 2 | AI Product Image Enhancer | Recover clarity when the original photo is soft | edge detail, label clarity, texture, no invented parts |
| 3 | Amazon Additional Product Image Generator | Create angle, detail, scale, comparison, and lifestyle support images | each image answers one buyer question |
| 4 | Amazon PDP and A+ Content Design Tool | Arrange the gallery and decide which images support A+ modules | image order, mobile thumbnail clarity, story flow |
| 5 | Amazon A+ Content AI | Turn selling points into module copy and layout direction | copy matches the image and avoids unsupported claims |
This order matters. If I start with A+ content before the source image is clean, I end up designing around weak material. If I generate lifestyle scenes before locking the exact product shape, I invite the AI to change the SKU.
Product Shot White Background: Prepare the Source Photo
The first job is boring, and that is why it gets skipped. I need one source image that represents the product accurately.
For the bottle example, I use the white background workflow to clean the edge, remove background clutter, center the bottle, and keep a natural shadow. If the cap or label area looks soft, I run the cleaned image through the image enhancer before creating new listing images.
I do not want the enhancer to make the product look more expensive. I want it to make the real cap, coating, rim, bottom band, and straw opening easier to inspect.
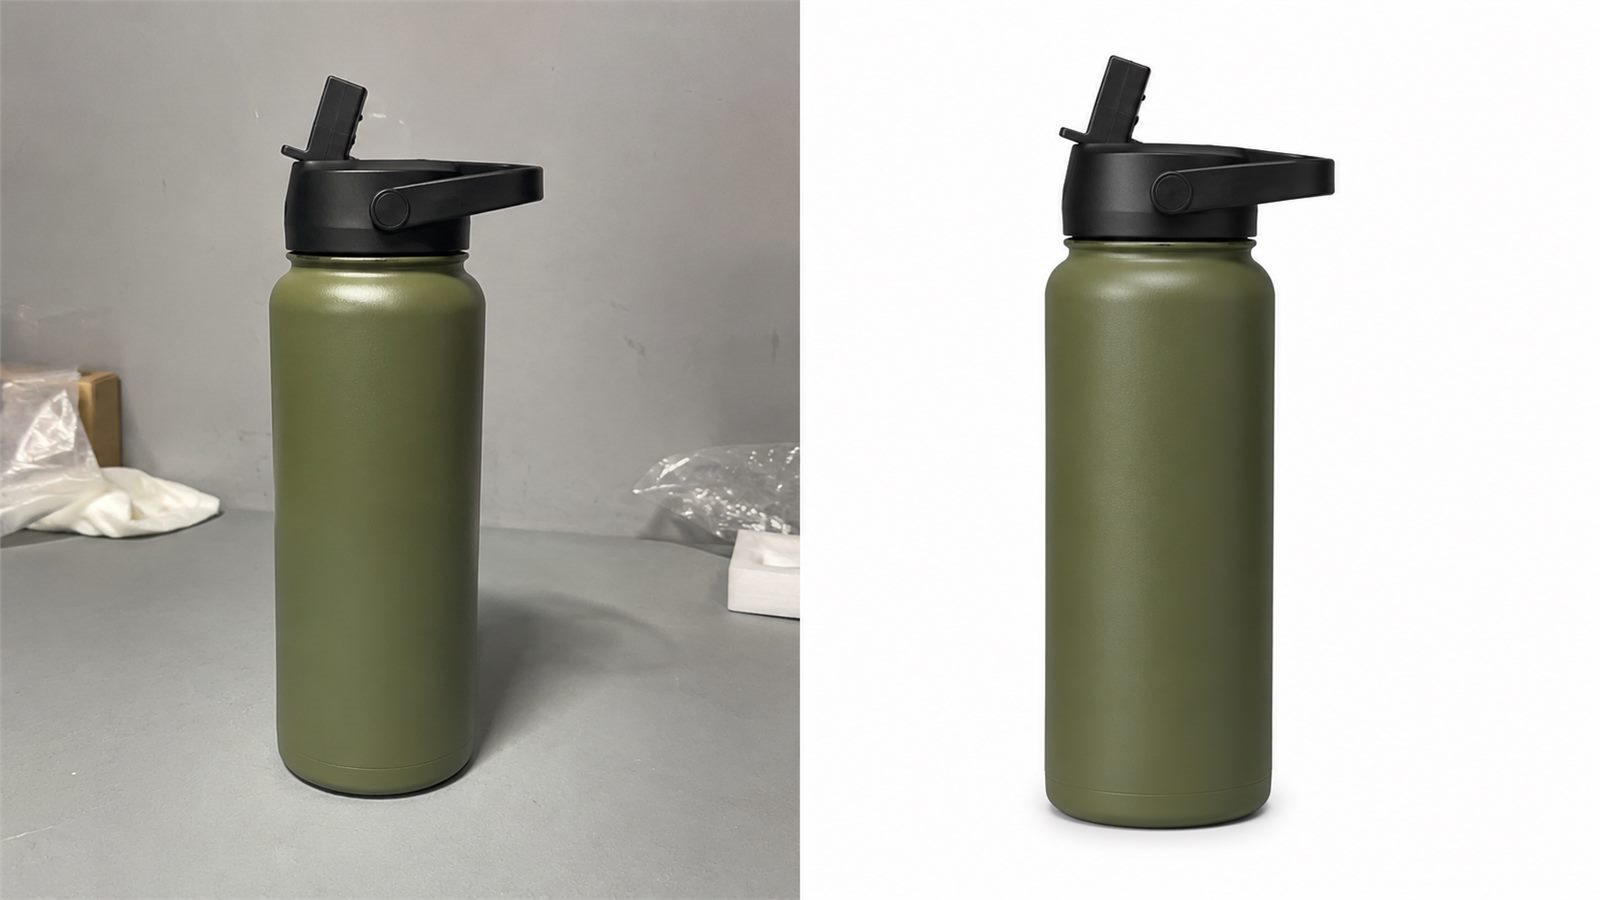
My QA check at this stage is strict:
- the product outline matches the original
- the lid has the same shape
- the color stays matte olive
- the straw opening remains visible
- no accessories appear unless they ship in the box
- the background is clean enough for the main image
If this source image fails, the rest of the gallery will inherit the problem.
Amazon Listing Image Size and Main Image QA
For Amazon listing images, the main image should make the product easy to recognize. I treat it as a compliance and clarity asset before I think about brand mood.
For the bottle, I keep the main image upright, centered, cropped with enough margin, and placed on a clean white background. I avoid callout text, lifestyle props, outdoor scenery, water splash effects, and extra accessories unless they belong in the main offer.
I check it against Amazon's practical recommendations from the product detail page guide: the product should dominate the frame, the background should stay plain, and the image should be large enough for zoom. I also open the image at mobile thumbnail size. A strong desktop hero can still fail if the cap, opening, or silhouette becomes unclear on a phone.
Best Practices 2026: Turn Selling Points Into Buyer Proof
This is where LoomaDesign is useful. The seller does not need to invent a new instruction from scratch for every image type. The seller supplies product facts and selling points, then I decide which visual job belongs to each fact.
For the bottle, I turn the selling points into this image plan:
| Seller input | Image I create | Design reason |
|---|---|---|
| easy to carry | side angle showing loop handle and hand scale | buyer sees how the lid works |
| easy to clean | open lid, straw, brush, and mouth detail | buyer checks maintenance before buying |
| outdoor use | lifestyle scene on a trail or gym bench | use case feels concrete |
| keeps drinks cold | material and stainless interior detail | visual proof supports the claim without inventing performance data |
| durable finish | close-up of powder coating and base | texture and edge quality support the price |
| 32 oz size | scale image beside hand, backpack pocket, or common bottle | buyer understands size before checkout |
This is where the time savings become visible. For a bottle like this, I normally brief a main image, two details, one scale image, one lifestyle image, one included-parts image, and one A+ module reference. With a fixed ecommerce workflow, I can enter the product truth once and create the set in connected passes. The review still takes judgment, but the repeated briefing work drops sharply.
Gallery Design: Build the Set in Buyer Order
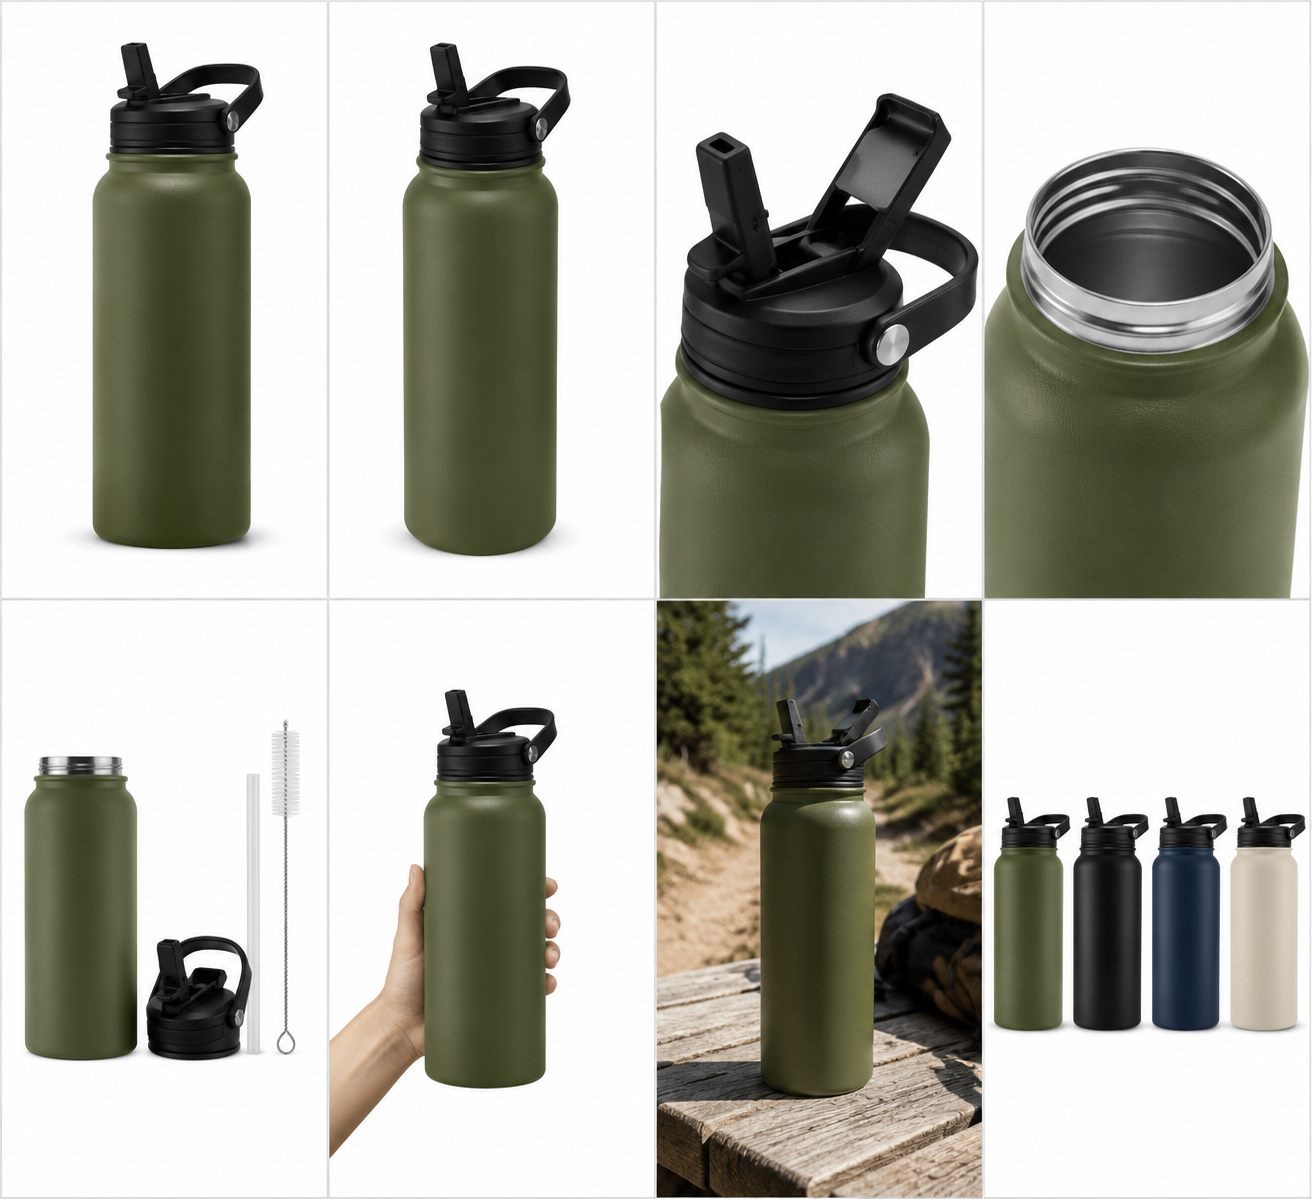
I usually arrange Amazon listing images in this order:
- main image
- angle image
- detail image
- scale image
- lifestyle image
- included-parts image
- comparison or variant image
- A+ support image
The exact order changes by category. A skincare kit may need texture and routine order earlier. A backpack may need interior layout before lifestyle. Jewelry often needs scale on body before packaging.
For the bottle, I place the detail image before the lifestyle scene because buyers need to trust the lid and straw before they care about the outdoor mood. If the product has several color options, I add the variant image near the end so it helps selection without interrupting the main product explanation.
This is also where I use Amazon PDP and A+ Content Design Tool. I want to see the gallery as a sequence because shoppers read thumbnails in order, even when they scan quickly.
Amazon A+ Content Image Workflow: Reuse the Same Product Truth
The gallery gives fast answers. A+ content gives deeper answers.
For the bottle example, I reuse the strongest listing assets in A+ modules:
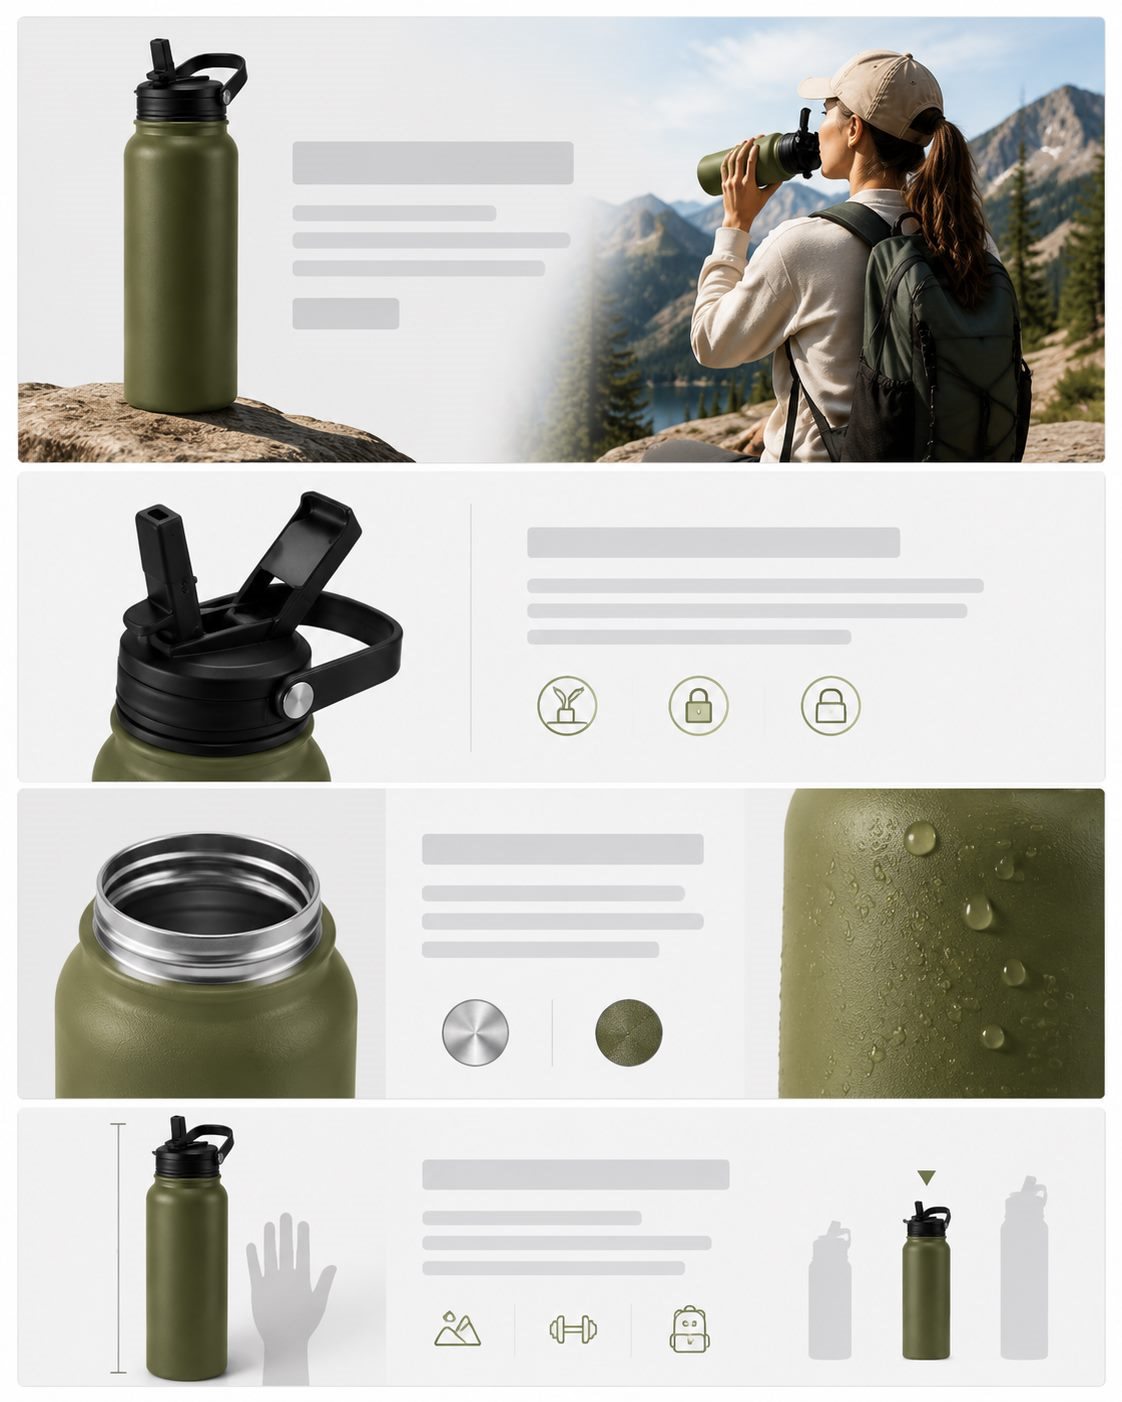
- a hero module with the clean product shot and one core use case
- a feature tile for the lid and straw design
- a material module for stainless steel and coating
- a scale or capacity module
- a comparison module for colors or sizes
- a care module showing included brush and cleaning parts
This is where Amazon A+ Content AI helps. The seller enters the product's selling points, and the tool turns them into module copy and layout direction. I still review every line. A+ copy should match what the image proves. If the image only shows a straw lid, the copy should not claim total leakproof performance unless the product documentation supports it.
Amazon's own A+ page says A+ content can include enhanced images, comparison charts, videos, hotspots, carousels, and Q&A modules. I do not try to use every module. I pick the modules that reduce hesitation for that product.
Common Image Mistakes I Reject Before Upload
AI product images often fail in small ways. Those small changes create big trust problems.
| Error | Why it hurts the listing | How I avoid it |
|---|---|---|
| changed lid or cap | buyer receives a different-looking product | lock the reference photo and compare lid shape after every output |
| wrong color tone | returns and poor reviews increase | keep a color reference beside every generated image |
| fake accessory | image overpromises the box contents | list included parts before generation |
| unreadable text in image | mobile shoppers cannot read the module | use short A+ copy and preview on phone size |
| invented feature claim | compliance and trust risk | connect every claim to a product fact |
| lifestyle scene hides the product | shopper sees mood, not proof | keep product large enough and fully visible |
| too many image styles | gallery feels stitched together | keep lighting, crop, and product color consistent |
I am more tolerant of a plain image than an inaccurate image. Plain can still sell if the product proof is clear. Inaccurate images create doubt.
Category Notes: Bags, Skincare, Kitchen, Jewelry
For bags, I use AI to show interior layout, zipper detail, strap attachment, fabric texture, and body scale. A bag listing with five pretty lifestyle images and no interior photo feels unfinished.
For skincare, I focus on label accuracy, cap detail, texture, formula color, routine order, and pack components. I avoid AI skin-result visuals unless the brand has the evidence and compliance clearance to support the claim.
For small kitchen products, I want controls, removable parts, cleaning detail, counter scale, and real use scenes. A warm kitchen background helps, but only after the buyer can inspect the product.
For jewelry, I check clasp, chain thickness, stone setting, metal tone, model scale, and packaging. AI can make jewelry look better than the real item with almost no visible warning, so I review those images at zoom size.
Amazon Listing Images QA Checklist
Before I publish the image set, I check:
- main image is clean, centered, and large enough for zoom
- product fills the frame without cutting off important edges
- white background is clean where Amazon expects it
- the gallery includes at least four useful images
- angles, details, use, and variations are covered where relevant
- no product part changed shape
- color stays consistent across the gallery and A+ modules
- included parts match the real box contents
- lifestyle scenes do not imply unsupported features
- A+ text stays readable on mobile
- comparison images use real product differences
- every claim connects to a visible product feature or seller-provided fact
This checklist is where AI becomes dependable for ecommerce work. The generator can produce options fast. The designer's job is to reject the options that make the product less true.
Putting It Together: My LoomaDesign Workflow
Here is exactly how I build this water bottle set in LoomaDesign.
I start with one accurate product photo, ideally a front or three-quarter shot where the lid, handle, bottle shape, color, and surface finish are clear. If the supplier image has a gray cast, messy shadow, or uneven background, I clean it first with the Product Retouching and White Background Tool. That gives me a controlled reference image for the rest of the set.
If the cap edge, powder-coated texture, or logo area looks soft, I run the cleaned image through the AI Product Image Enhancer. I only keep the result if the real details are sharper. If the lid shape, strap, spout, color, or scale changes, that output is rejected.
From that approved reference, I build the listing set in passes:
- Use the Amazon Additional Product Image Generator to create the angle view, lid close-up, straw detail, included brush image, scale reference, and lifestyle scene.
- Use the multi-angle image workflow when I want a consistent grid of views from the same bottle, then crop the approved grid into separate listing images in Photoshop or another editor.
- Use the Amazon PDP and A+ Content Design Tool to check image order, mobile thumbnail clarity, and whether the first six images answer the buyer's main questions.
- Use Amazon A+ Content AI to turn the same product facts into module ideas: material proof, leak-proof explanation, comparison notes, feature tiles, and short copy.
For this bottle, the final set includes one white-background hero image, one three-quarter angle, one lid-detail image, one material close-up, one included-parts image, one scale reference, one lifestyle scene, one color or variant card, and one A+ module strip. I upscale the approved images before final cropping, then add short callouts only after the product facts are locked.
This is where the workflow saves real time. A traditional image set often becomes six or eight separate briefs: one for the white-background image, one for details, one for lifestyle, one for comparison, one for A+ modules, and another round for corrections. In LoomaDesign, I can keep those jobs connected to the same source photo and product facts. I still use design judgment, but I spend it on image order, proof, rejection, and final polish instead of rebuilding the brief from zero each time.
FAQ
Can an AI image generator create Amazon listing images from one product photo? Yes, if the source photo is accurate and the workflow protects the SKU. One reliable photo can support a main image, angle images, detail crops, scale references, lifestyle scenes, comparison visuals, and A+ support assets.
The final set still needs human QA. I compare every output against the original product, especially the cap, label, color, accessories, and scale.
Do users need to write detailed image instructions in LoomaDesign? No. The user mainly provides product facts, selling points, and visual goals. LoomaDesign uses feature-specific templates behind the workflow, so the user does not need to write a long instruction for every image type.
The better input is product truth: what ships, what material it uses, what buyer question the image should answer, and which details cannot change.
What should sellers enter before generating images? Enter product type, color, material, size, included parts, selling points, buyer doubts, and details that must stay fixed. This gives the system enough product truth to build useful listing images.
For a water bottle, I include capacity, lid type, straw design, finish, interior material, included brush, and the use cases the seller wants to show.
Which LoomaDesign functions work together for Amazon listing images? Use white background cleanup or image enhancement first, then generate additional product images, then plan PDP and A+ content, then use A+ Content AI for module copy and layout direction.
The functions work best as one production flow. Cleanup protects the source, additional images explain the product, PDP planning orders the gallery, and A+ content gives deeper proof.
What Amazon image requirements should I keep in mind? Amazon Ads recommends four or more high-quality images, different angles, important details, feature demonstration, variations where relevant, a plain white background, at least 80% product fill, and at least 1000 pixels in height or width for zoom.
I use those rules as a floor. A stronger listing also needs image order, mobile thumbnail clarity, color consistency, real product scale, and copy that matches what the image can prove.