How to Fix Pixelated Product Photos
Pixelated product photos usually come from one of four problems: the source file is too small, the image has been compressed too many times, the store theme is cropping or stretching it, or the original photo never captured enough product detail. AI can help with some of those problems. It needs real product information in the source file to protect product truth.
For ecommerce, the goal is a product image that still looks accurate at thumbnail size, product-page size, zoom size, and mobile crop size. A seller should fix the image only when the repair keeps the product honest.
Quick Answer
To fix pixelated product photos, first identify whether the problem comes from file size, compression, crop, focus, or missing source detail. Use an AI enhancer or upscaler when the image still contains visible product edges, label structure, texture, and shape. Reshoot when the original file is too small, blurry, distorted, or missing the details buyers need to inspect.
If the photo is only soft after upload, export a larger file, check theme crop settings, and avoid repeated compression. If the photo is genuinely low resolution, use enhancement as a controlled repair step and compare the output against the product. If the product detail is gone, a reshoot is safer than an invented sharp image.
Diagnose the Pixelation First
Start by asking why the image became pixelated before choosing an AI upscaler. A supplier image may have been downloaded from a marketplace thumbnail. A product photo may have been copied from a messaging app. A Shopify theme may be displaying a crop larger than the uploaded file can support. An ad export may have been saved and resaved until the image lost clean edges.
The fix changes by cause:
| Problem | What it looks like | First fix |
|---|---|---|
| Small source file | Blocky edges, no fine texture, label text unreadable | Find a larger source or reshoot |
| Repeated compression | Smearing, artifacts, color noise, rough edges | Re-export from the original file |
| Theme or crop mismatch | Looks fine in editor, weak on page or mobile | Check display size, crop, and aspect ratio |
| Slight softness | Edges exist but lack crispness | Use AI enhancement or sharpening |
| Motion blur or missed focus | Product never looks crisp anywhere | Reshoot if detail matters |
| Over-editing | Plastic texture, fake edges, strange text | Step back to an earlier file |
This diagnosis protects the product page. Upscaling a weak file may make it look more polished, but it can also produce a label, seam, texture, or reflection that never existed. That is a problem when buyers use the photo to judge size, materials, finish, or included parts.
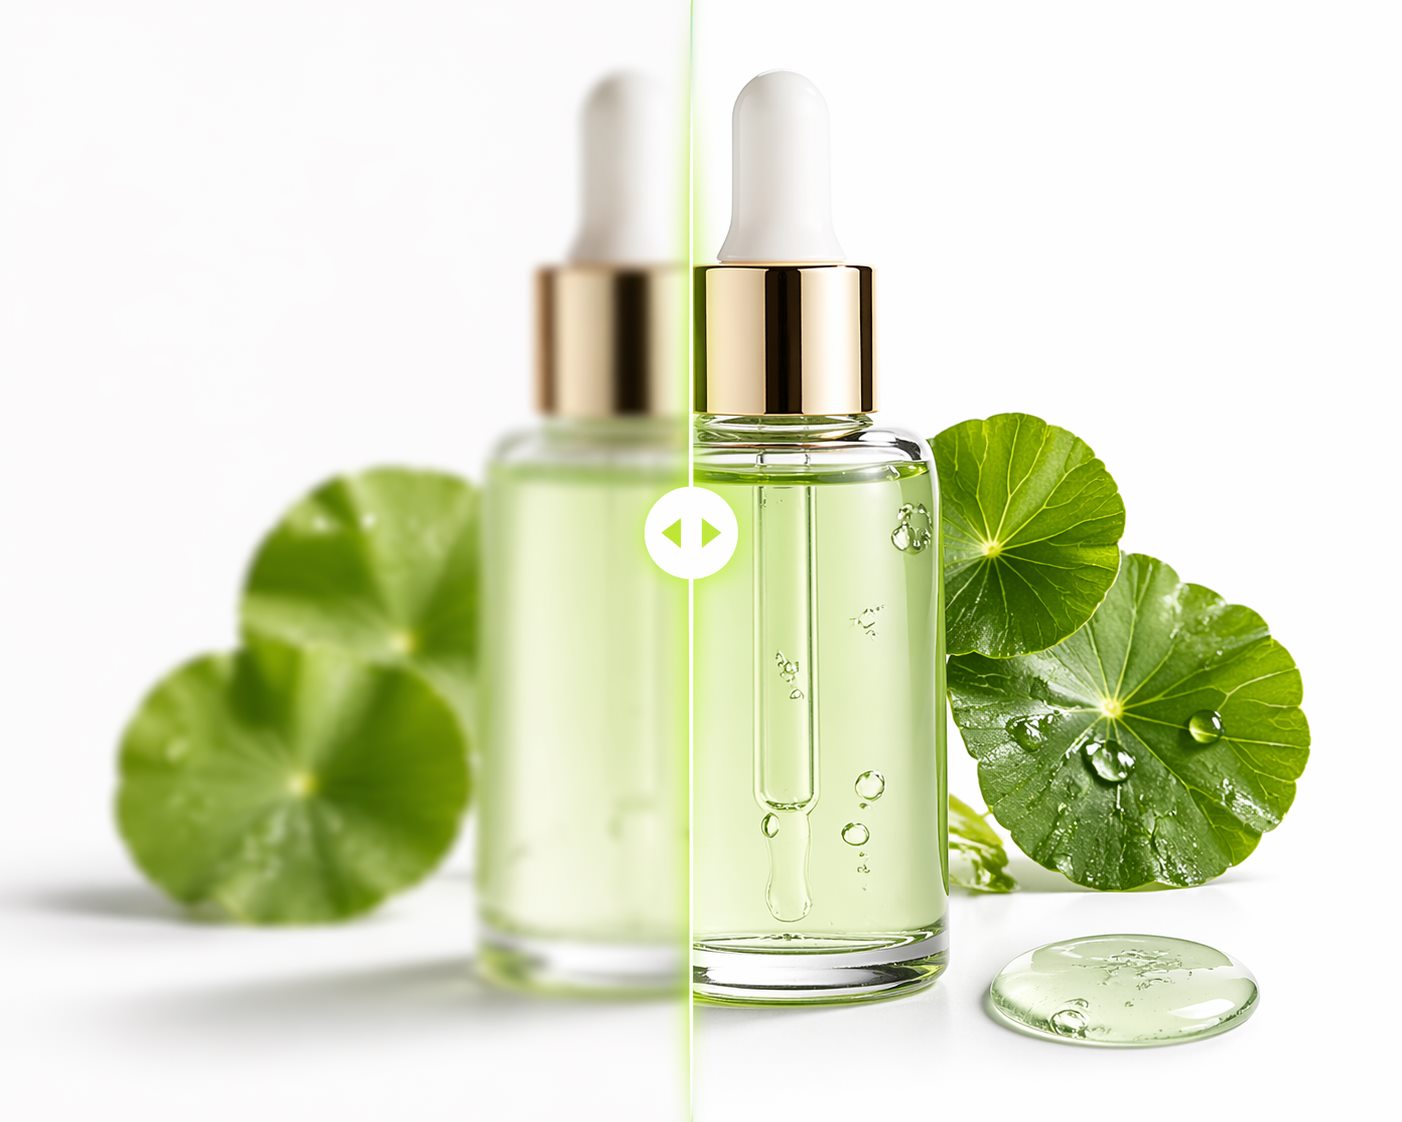
When AI Enhancement Helps
AI enhancement works best when the image is close to usable. The product edges are visible. The silhouette is correct. The label is mostly readable. The material texture still exists. The photo needs sharper output, cleaner compression, better detail separation, or a larger export for product-page reuse.
That makes enhancement useful for supplier photos, older catalog files, marketplace refreshes, PDP modules, A+ visuals, and ad assets. A seller may have one acceptable packshot but need a cleaner version before building background variants, lifestyle images, or feature modules. In that case, enhancement is a practical first step.
Use enhancement when:
- the product shape is correct but the image is too soft
- the file needs a larger version for PDP or marketplace use
- compression has weakened edges but not destroyed them
- the background, crop, or lighting is acceptable enough to keep
- label and packaging detail can be compared against the real product
- the final image will still go through human review before publishing
Review the enhanced image where buyers will see it: product grid, mobile PDP, zoom view, secondary listing image, A+ module, and ad preview.
When to Reshoot Instead
Reshoot when the image cannot prove the product. If the label is unreadable, the seam detail is gone, the item edge is guessed, the color cannot be trusted, or the product was photographed from the wrong angle, enhancement becomes risky. The output may look better while becoming less true.
This is especially important for products where detail carries trust: beauty packaging, supplements, jewelry, apparel seams, electronics ports, textured materials, transparent items, reflective metal, medical-adjacent products, and anything with compliance-sensitive claims. If the buyer needs to inspect the detail before purchase, keep invented detail out of the final image.
A reshoot can be a controlled phone or camera session with stable lighting, clean background, correct angle, and enough resolution. That one reliable source image can then support AI background cleanup, enhancement, scene generation, and PDP reuse.
What Counts as a High Resolution Product Photo?
A high resolution product photo is a file that gives the channel enough detail for the way buyers inspect the product. A small product tile, a Shopify gallery, an Amazon listing image, a zoom view, a PDP module, and an ad crop all use the file differently.
For ecommerce work, treat a high-resolution source photo as one that:
- is large enough for the largest intended display and crop
- keeps product edges clean without visible blocks
- preserves label, texture, material, and important shape detail
- can be exported into required aspect ratios without heavy quality loss
- still looks accurate after compression
- gives AI tools enough real information to enhance or create variants safely
Amazon Ads recommends product detail page images large enough for zoom support, and Google Merchant Center's image guidance gives product image requirements for Shopping surfaces. Google has also announced larger minimum image-size requirements that take effect on January 31, 2027. The practical lesson is already useful in 2026: tiny source files create future cleanup work.
A Practical Repair Workflow
Start with the original file. Avoid repairing a screenshot, compressed chat image, marketplace thumbnail, or file that has already been edited several times if the original is available. Every generation of compression removes information the product page may need later.
Next, inspect the image at 100 percent and at product-page size. Look for blocky edges, label noise, soft texture, color banding, and crop problems. Then compare it against the real product or a trusted reference photo.
Use this sequence:
- Recover the largest original file available.
- Check whether pixelation comes from upload, crop, compression, or source quality.
- Re-export from the original file if compression caused the issue.
- Use LoomaDesign's image enhancer or another controlled enhancer when source detail still exists.
- Retouch dust, glare, background defects, and color issues only after resolution is stable.
- Create final versions for marketplace image, Shopify PDP, module, and ad use.
- Review every final image against the real SKU before publishing.
This workflow also helps with AI product scenes. A weak source image leads to weak background replacement and weak product-scene generation. A cleaner source image gives the generator more reliable product information to preserve.
Common Mistakes
The first mistake is upscaling a file that should be replaced. If the source image is a thumbnail, the enhancer has too little real product data to work with. The result can look sharp and still misrepresent the item.
The second mistake is fixing sharpness before fixing crop and export settings. A product photo may look pixelated because the page is stretching it beyond its file size. In that case, enhancement may hide the symptom while the theme still displays the asset poorly.
The third mistake is treating "HD" as a single target. A square marketplace image, vertical mobile PDP image, horizontal A+ module, and cropped ad asset may need different exports. Convert an image to HD after deciding where the file will appear.
LoomaDesign workflow for image repair
LoomaDesign's image enhancer fits the repair stage before broader product visual work. Sellers can improve source image clarity, then use the cleaner asset for AI product photography, background cleanup, listing images, or PDP modules.
For adjacent workflows, use the best AI image enhancer for Amazon listing photos guide when the main problem is marketplace quality, the AI product photo retouching tools for ecommerce guide when detail cleanup matters, and the AI product photography for Shopify and Amazon workflow when the next step is generating usable product scenes.
FAQ
Can you unpixelate an image?
Sometimes. If the image still contains real edges, shape, and texture, AI enhancement can make it cleaner and larger. If the detail is gone, the tool can only estimate what might have been there. That may be unacceptable for product photos.
How do I convert an image to HD for ecommerce?
Start from the largest original file, correct crop and compression, then use enhancement or upscaling if the source detail is still intact. Export separate files for the product page, marketplace listing, module, and ad formats so one universal file is not carrying every crop.
Why do product photos look pixelated after upload?
Common causes include small source files, repeated compression, theme cropping, oversized display areas, poor export settings, and files downloaded from thumbnails while the originals remain elsewhere.
What is considered a high resolution product photo?
For ecommerce, a high resolution product photo is large enough for the intended channel and still preserves product edges, label detail, texture, color, and shape after crop and compression. The useful definition depends on how buyers will inspect the product.
Should I use an AI upscaler or reshoot?
Use an AI upscaler when the image is nearly usable and detail remains visible. Reshoot when product facts cannot be verified from the file.